AlphaStrip Demo
The first
thing you have to do is to click Image>Image Size. Change the Resolution
to 360 pixels/inch and make sure the Width and Height are
around 10" X 12", or there abouts.
Create a New
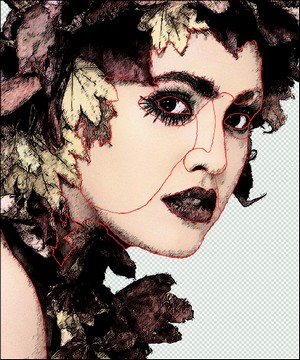
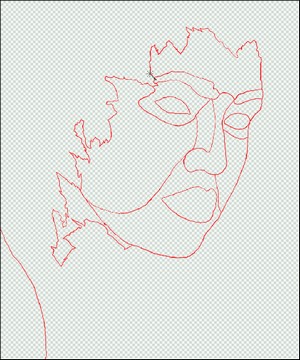
Layer and draw in the areas of the forehead, cheeks, etc. These will be
used to make Paths that we will use to select the Wave Forms. Call the
Layer Pathways.
|
|
|
|
Fig 1
|
Fig 2
|
Turn off
your Picture Layer and select the Pathways Layer.
Grab your Magic Wand and click on the Forehead section.
Once you have the "Marching Ants", click on Select>Modify>Expand.
On the Expand Selection pop-up, set the Expand by: to somewhere
between 5 and 10 pixels. Just make sure that the "Marching Ants" are
in the middle of your line.
Move your Magic Wand inside of the selected area and Right Click
the Mouse.
Select Make Work Path.... On the Make Work Path pop-up set the Tolerance
to 1 and press Ok.
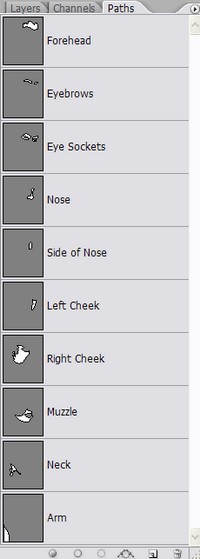
On the Paths palette, double click Work Path and change it's name
(Forehead, Rt Cheek, etc.).
Do this for each area on the Pathways Layer.
You should have something that looks like this...
|
|
|
Fig 3
|
Now we'll
get some Waves.
Since we
want some pretty tight Waves, we gotta do things a little different then
usual...
Click File>New
and set up a new sheet as follows:
Resolution:
72 pixels/inch
Width: 12 inches
Height: 12 inches
RGB Color
Press Ok.
Fill this new sheet with 50%
Gray.
Select Alpha
Strip and load wave01.psp
Pull the Ampitude
down about half way.
Press Ok.
Press Select>All.
Press Edit>Copy.
Minimize the
drawing of the waves (incase you need it again).
Click Edit>Paste
to put the Wave Pattern onto your drawing. You will notice that it is small.
This is because of the difference in the Resolution of the two drawings, but
that's what we want.
Click Edit>Transform>Scale.
While holding down the Shift and Alt Keys, enlarge the Wave Pattern to about
3/4 the width of the picture. Any size will do as long as it covers the largest
Path area.
Now,
Duplicate the Layer. You are going to need it.
Move the
Wave Pattern over an area you want to cover. You can Scale it, Rotate it, Warp
it or anything you want to it. Just make sure that it covers the area you are
working with.
When you get
it situated the way you want it, select the Path that covers the area.
Right click on the Path and select Make Selection...
Press Select>Inverse.
Now press Edit>Cut
and you have your first piece of Wave Patten on your drawing.
Click Edit>
Paste again and do the next area. Put it at a different angle, etc.
Now if you
don't have enough of the Wave Pattern left to make your next Cut, reserect that
copy of the Wave Pattern you made. press Select>All, Edit>Copy
and Past it again.
Do this for
all of the areas...
After you
are done, turn off EVERYTHING except the Layers with the Wave Patterns on them
(except the overall copy that you made, leave that one off). Select one of the
Wave Layers and Right Click on it. Select Merge Visable. This will put
all of the Layers onto one Layer.
Turn off the
Pathways Layer and turn on and select the Picture Layer.
Duplicate
this Layer and press Image>Adjustments>Desaturate to turn it into
a Gray Scale drawing.
Make sure
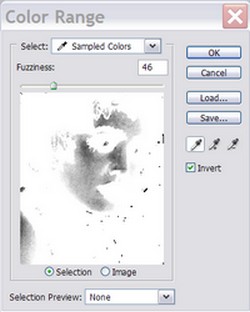
your Foreground Color is White and press Select>Color Range...
You should
see something like this (make sure Invert is checked)
|
|
|
Fig 4
|
Press Ok
and select the Wave Pattern Layer.
Press Add
Layer Mask (at the bottom of your Layers Palette) to vary the darkness of
the Wave Pattern to match the light and dark areas of the Picture. The Gray
Picture can be deleted.
Reset the Blending
Mode of the Masked Wave Pattern Layer to Color Burn.
Create a New
Layer below your Picture and fill it with any color that you want.
Select Alpha
Strip and load default.psp. Turn the Angle to where ever you want it
and press Ok.
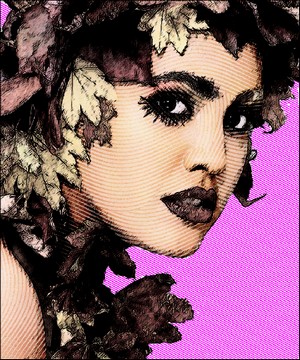
Turn on the
Layer you just made, Picture and the Wave Pattern. Turn everything else off. Flatten
the image and convert it to a resolution of 72 dpi and you're done...
|
|
|
Fig 5
|
Enjoy…
C-Wied
©
2007 by C-Wieds Graphic Arts
All
rights reserved.
|