 | |  |
 | |  | |
| Contents | |
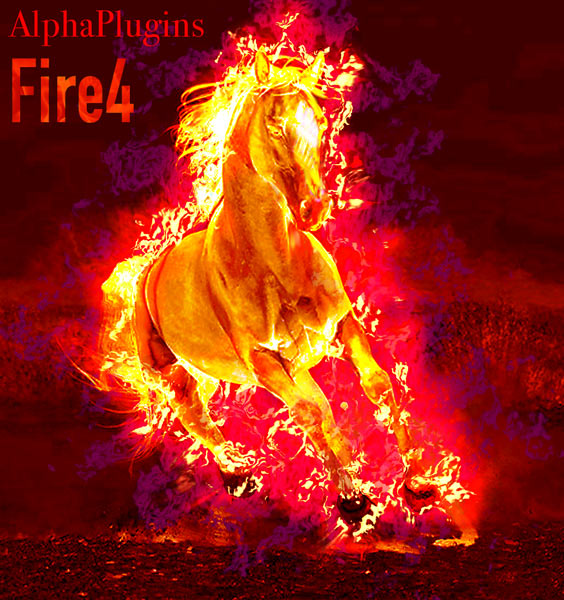
IntroductionAlphaPlugins FireFor is an incredibly handy Photoshop filter for creating natural-looking smoke and fire effects. An effortless, intuitive process helps you achieve attractive and realistic results. Dive right in and experiment with the plugins power, using factory presets like wizard palettes of key flame and smoke effects that can be applied with the simple click of a mouse. |
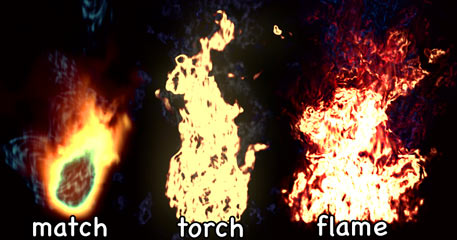
Main FeaturesRealistic Fire:AlphaPlugings FireFor is a high-end tool for adding realistic fire effects in Photoshop projects. Its engine is specially designed for used in high-res, multilayer compositions and produces incredible fire effects in real time. The result is better productivity and attractive results. | Naturalistic Smoke:In imagery, smoke enhances the realism of fire. Thats why our plug-in contains built-in features for adding smoke, with additional parameters to vary intensity, color, turbulence, size and more. For more sophisticate compositions, warm-colored smoke can be used as an additional underlying fire layer. | Smart Source:Compared to using a stock image of fire, adding fire to images with a plug-in filter allows you to shape the fire as needed. AlphaPlugins FireFor contains powerful, smart features for burning fire along a custom drawn paths, selection masks, texts, and contours. | Well-Though UI:AlphaPlugins FireFor is a real tool what should be useful in practical work. We spent many time to make interface of plug-in convenient and clean. Many features can be adjusted intuitively and native like you work with a real physical object. For clearance, only essential parameters are presented and these are concluded in thematic groups and tabs. | Power Blending:You want your final fire effects to look beautiful and realistic, and AlphaPlugins FireFor has the power to achieve that whether youre working with light or dark images. In additional to standard Photoshop's blending modes, the plug-in contains several original blending modes for mixing fires, smokes and glows. A unique Heat Haze feature lets you add beautiful blends to bright fires with any kind of background image. | Presets & Wizard:To save time and effort, AlphaPlugins FireFor contains a variety of factory presets for quickly choosing fire effects and tuning up final parameters as needed. A special wizard palette puts these main types of fires and smokes at your fingertips, ready to use with just a few clicks. |
|
 | |  | |  |
 | |  |
| Installation and Registration | |
| |  Windows Installation. Windows Installation.
Installing AlphaPlugins FireFor is very easy.
- Download the Fire4Installer.exe file from here.
- Launch this file and follow the instructions.
 If you have both 32bit and 64bit versions of Photoshop, then please, attend what version of plug-in you would like to install: (32bit), or, (64bit). If you have both 32bit and 64bit versions of Photoshop, then please, attend what version of plug-in you would like to install: (32bit), or, (64bit).
- During installation the installer will attempt to automatically detect all installed versions of Photoshop, and will offer a variant of target path. If you have a version of Photoshop Creative Cloud then you can install plug-in into a common pug-ins folder:
C:\Program Files\Common Files\Adobe\Plug-Ins\CC
In this case, you should not reinstall plug-in if you will install future Photoshop's versions. Else, you always can install plug-in into a local plug-ins folder i.e.:
C:\Program Files\Adobe\Adobe Photoshop CC2018\Plug-ins.
.
- In you want then you can choose a destination folder manually by pressing the 'Browse' button.
- Click the Next button, and complete the installation.
 | To install the plug-in using an image editing program other than Photoshop, please consult the plug-in installation section in the user manual for whichever editor you have chosen. |
|
 Macintosh Installation. Macintosh Installation.
When installing the AlphaPlugins FireFor plug-in for Macintosh, our smart installer will locate the correct installation path for you easily and automatically. - Download the Fire4Installer.zip file from here.
- then, unzip it.
- Launch the Fire4Installer application and follow the instructions.
- The plug-in finds all installed versions of Photoshop. You should choose one. If you have a version of Photoshop Creative Cloud then you can install plug-in into a common
plug-ins folder:
/Library/Application Support/Adobe/Plug-Ins/CC
In this case, the plug-in will be available for all versions of Photoshop CC include future.
As variant you can install plug-in into a local plug-ins folder i.e.:
/Application/Adobe Photoshop CC2018/Plug-ins
or you can press "Custom" button and browse any other appropriate folder of your choice.
- Click the "Next" button and all the necessary files will be installed in the chosen folder.
 | To install the plug-in in Adobe Photoshop Elements or into a non-Photoshop image editor, locate the plug-in folder specifically for that image editor as it's manual prescribes. |
|
RegistrationYou will automatically receive the serial number for your copy of AlphaPlugins FireFor immediately following your purchase. There are two ways that you can register your copy of the AlphaPlugins FireFor plug-in: Online, and Offline. Online Registration.If you are connected to the Internet, then Online registration is the simplest way to register your copy of plug-in. After launching AlphaPlugins FireFor, you will see a registration dialogue box. Just select the Online registration option; insert your name; enter the serial number you received; and, click the Register button. The AlphaPlugins FireFor plug-in will automatically connect with our registration server to complete the registration process, show you a confirmation message that the registration of your plug-in has been successful. Then, just click the Close button registration is complete, and you are ready to use your new AlphaPlugins FireFor plug-in!  | If you are currently operating with an Internet firewall in place, it is recommended that you switch it off temporarily during the registration process. |
Offline Registration.Even if you do not use an Internet connection with your computer, you can still register your AlphaPlugins FireFor plug-in. Contact us to obtain an offline answer (for the Offline registration process) if you cannot connect to the Internet or if you are determined to keep your photo-editing computer isolated from any direct connection with the Internet. The Offline Registration Number is a numerical ID which will be valid for a few days: to complete your registration, just select the Offline option in the registration dialogue box; insert your Name, Serial Number, and Offline Answer; then click Register to complete the registration process, and Close the registration dialogue window.  | Remember: Per one serial number You can register so number of plug-in instances as number of licenses you purchased. I will however allow an extra registration for each plug-in serial number, so that users can install AlphaPlugins FireFor on, for instance, both their desktop and laptop computers. |
|
 | AlphaPlugins FireFor is a plug-in that works on much more than just Adobe Photoshop! Our software enables you to launch this plug-in (and many others) using graphic image editing programs that do not normally support Adobe Photoshop plug-ins. So, even if you do not have Adobe Photoshop on your computer, you can still launch Photoshop plug-ins using AlphaPlugins LaunchBox! By using LaunchBox, you can run a range of Photoshop plug-ins (including AlphaPlugins FireFor) using applications such as Adobe Lightroom, Aperture and many others. You can start running AlphaPlugins FireFor right out of the LaunchBox no matter what image editing software you are currently using! |
| |  | |  |
 | |  |
| Quick Start | |
| |
Is your AlphaPlugins FireFor already installed and registered? Take a quick look at how to use this amazing plug-in.
- Open a source picture in Photoshop. (The plug-in supports RGB or CMYK pictures with 8bits per channel)
- Choose a path creation Photoshop tool and draw a custom path. 
- Alternatively, can choose a selection tool and draw any selection area. 
- Go to Photoshop's menu Filter->AlphaPlugins->FireFor...
 | If you havent yet registered the plugin, please register it now. If you dont register you can use the plugin in trial mode for several days. |
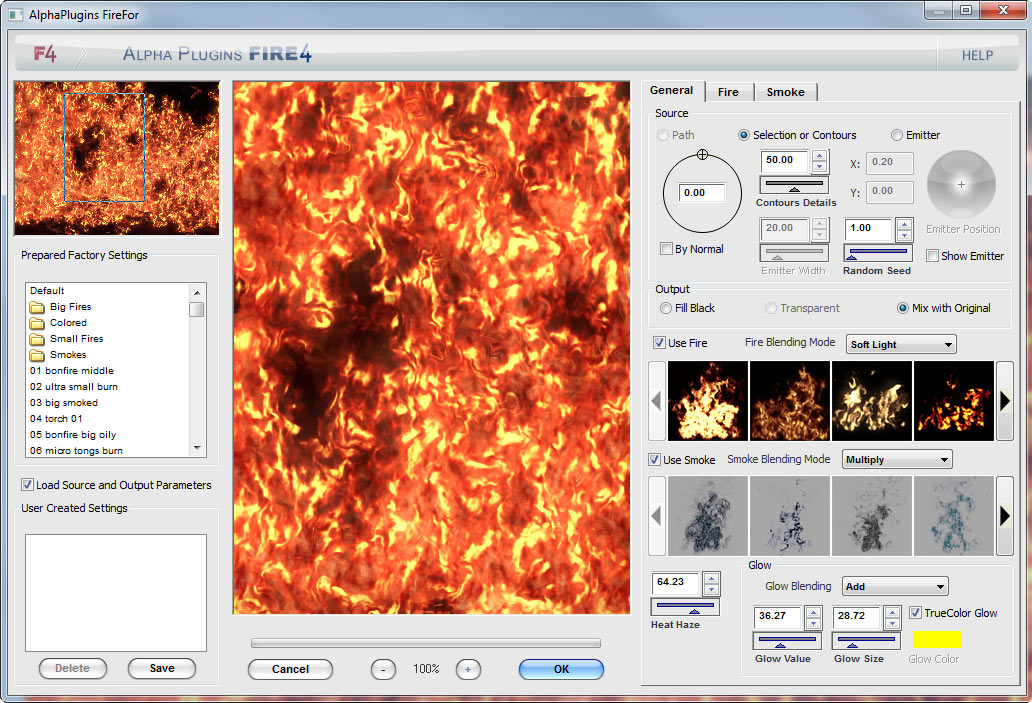
AlphaPlugins FireFor WindowNow you can see a window for the AlphaPlugins FireFor plug-in.
You can resize the AlphaPlugins FireFor window as needed. Keep in mind that resizing the window also
resizes the preview area. Be aware that a bigger preview area requires more time for effect processing. A preview window in the center of the
plug-in dialogue lets you see the effect on a small area of the image. This preview area can be shifted by holding the left mouse button.
You can increase or decrease preview scale by pressing: or or  buttons below the preview pane buttons below the preview pane- Ctrl (Cmd on Mac) + and - keys
- Ctrl (Cmd) + 0 or 1 keys
You can also shift the preview area by using the navigation window in the upper left corner of the FireFor dialog box.
Factory Preset AreaFactory presets are listed in the left side of window. You can apply a preset from this list to quickly explore plug-in features.
Thematic subfolders contain presets grouped by features, and in the bottom list you can save your own favorite parameter settings.
Plug-in ControlsIn the right side of the window you can view all plug-in controls, grouped under three tabs. (See the following Filter Parameters section for detailed explanation of filters).- General parameters for general effect usage
- Fire parameters for fire
- Smoke parameters for smoke effects
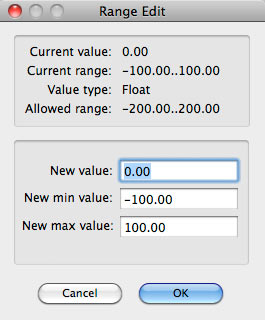
Parameter Values and Default Ranges  Note that some controls have blue digits, and some black (on Windows, all digits are black, but have blue or black borders on the sliders.
Black digits/borders mean that the default ranges of the parameters are fixed. Blue digits/borders mean that you can alter the default ranges. Right click (or Ctrl + click on Mac) over the slider area and a special dialog box appears to allow you to alter the default parameter ranges. 
|  |
At the top of the 'General' tab choose the 'Path' radio button. This lets you choose your created path as a source of fire.
If theres no path in your composition, the 'Path' radio button will be disabled. If you use a selection mask, then you can choose 'Selection or Contour'
radio button as an alternative.
After that, you should see that a fire was applied on your source. If desired, now you can play with the Fire and Smoke parameters, or apply a factory preset or items from wizard palette.
When Youre FinishedWhen you finish setting parameters. Click the OK button, or click Cancel to exit without applying filters.
* * * If you would like to know more techniques how to use the AlphaPlugins FireFor then see our tutorials |
| |  | |  |
 | |  |
| Filter Parameters | |
| |
All filter parameters are grouped into three tabbed windows for convenience.
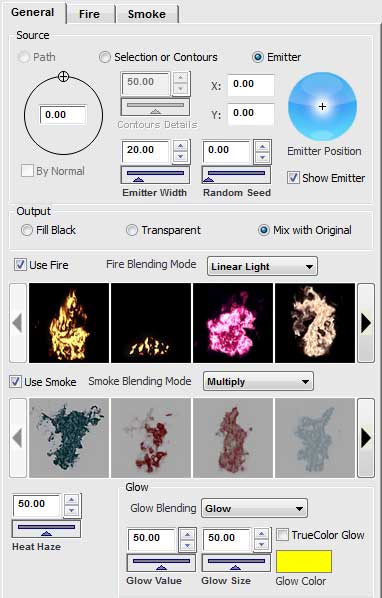
General TabThis tab contains the main effects parameters.
Source - Contains parameters for source of fire with three radio buttons: Path, Selection or Contours and Emitter.- Path lets to choose a Photoshop's custom paths as a fire source. If there is no path in the composition, this option is disabled.
- Selection or Contours lets you choose a selection area or contours as a fire source. If the composition contains a selected mask, the fire will be generated by the contour of the selection area. If there is no selection mask in the composition, the plug-in will try to build all possible contours by the source picture.
- Emitter defines an explicit emitter as the source of fire.
- Emitter Position lets you pick a center of explicit emitter. Use your mouse to drag the center of the crosshair marker to the preview area, or enter the specific center coordinates in X Y fields.
- By Normal if this checkbox is On, fire will be generated perpendicularly to paths or contours. If Off, fire will be generated accordingly to Fire Angle parameter
- Fire Angle lets you set the fire direction. If By Normal checkbox is On, then this parameter will define additional angles to normal.
- Emitter Width in case of explicit emitter, this parameter defines the width of the emitter.
- Contours Details this parameter is involved in the process of building contours.
- Random Seed defines an initial position of random generators. Also it defines a phase of flame in time.
- Show Emitter shows the fire's source. Fire's emitter contours will be shown only in preview. This feature doesnt affect the final result.
Output - This group of radio buttons lets you define how the fire results mix with the original image.- Fill Black select if the work will be used on a black background.
- Transparent select if the work will be used on a transparent background for use in Photoshop compositing. (if the original picture has a transparent channel)
- Mix with Original select if the work will be blended with a source image. The blending modes can be found in dropdown menus for Fire Blending Mode and Smoke Blending Mode.
- Fire Blending Mode and Smoke Blending Mode contain lists of blending modes for fire and smoke effects. Except for standard blending modes, these lists contain several specific modes for firing/smoking effects.
- Use Fire and Use Smoke switch fire and smoke effects Off and On.
- Heat Haze this unique feature lets you achieve additional realism with fire blending on any type of source picture.
Glow - These parameters let you work with additional quick glow effects.- Glow Blending list of glow blending modes.
- Glow Value defines glow intensity.
- Glow Size size of glow.
- Glow Color color of glow.
- TrueColor Glow lets you use actual fire colors as a glow color.
|  |
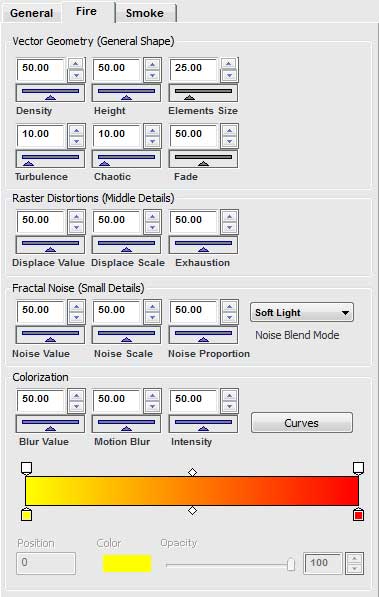
Fire TabThis tab contains parameters related to fire effects.Vector Geometry (General Shape) - Collects parameters for the shape of flames' tongues, defined by particle system.- Density density of particles flow.
- Height height of fire depending on the source image size.
- Elements Size sizes of particles elements.
- Turbulence a dynamic characteristic of fire burning process.
- Chaotic randomization of particles flow.
- Fade defines dying particles during timelife.
Raster Distortion (Middle Details) - These parameters control the middle level of flaming details using raster displacement algorithms.- Displace Value intensity of raster displacement.
- Displace Scale size of turbulence displacement.
- Exhaustion additional texturization of displacement.
Fractal Noise (Small Details) - These parameters introduce additional fractal noise component.- Noise Value intensity of noise.
- Noise Scale scale of noise pattern.
- Noise Proportion proportion of noise elements.
- Noise Blend Mode noise blending mode, not to be confused with the Fire Blending Mode. This parameter doesnt mix the noise with the source picture, but defines how fractal noise pattern is mixed with flame.
Colorization - This group contains the parameters of fire color and final tuning.- Blur Value particles system blurring.
- Motion Blur additional motion blur for flames' tongues.
- Intensity flame saturation.
- Color Gradient this element lets you define the final flame coloring. It can be used as a standard Photoshop gradient control. You can define color key marks in bottom of this control, and transparency marks on top. Color and Opacity controls are enabled when a keymark is selected. To delete a keymark, just move this mark outside of control.
|  |
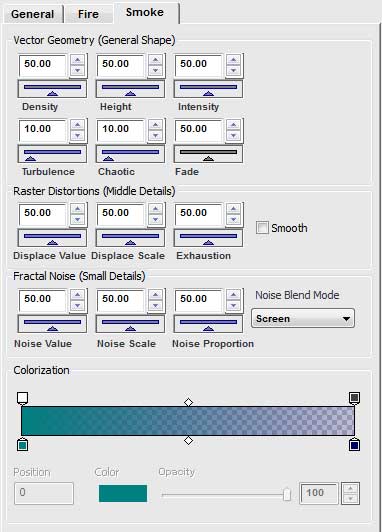
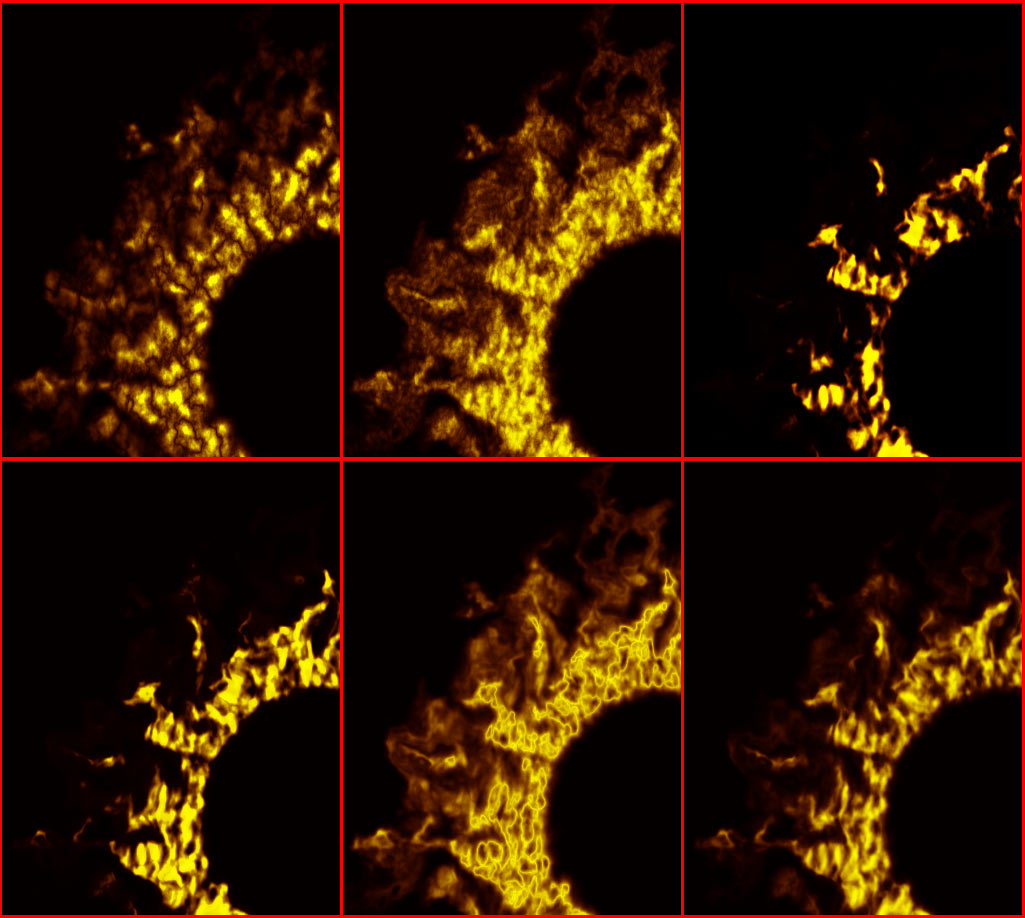 Samples of different fractal noise textures on fire. Samples of different fractal noise textures on fire.Smoke TabThis tab collects parameters related to the smoke features. Vector Geometry (General Shape) - Parameters responsible for rough smoke plume form, defined by particles system.- Density smoke flow intensity.
- Height height of smoke depending on source image size.
- Intensity smoke saturation.
- Turbulence smoke swirling.
- Chaotic randomization of smoke particles flow.
- Fade dilution smoke particles by timelife.
Raster Distortion (Middle Details) - Parameters responsible for middle level of smoking details.- Displace Value intensity of raster displacement.
- Displace Scale size of turbulence displacement.
- Exhaustion additional texturization of displace algorithm.
- Smooth distinguish between smooth smoke, or smoke with numerous small noise details.
Fractal Noise (Small Details) - Parameters for additional fractal noise component.- Noise Value intensity of noise.
- Noise Scale scale of noise pattern.
- Noise Proportion proportion of noise elements.
- Noise Blend Mode noise blending mode, not to be confused with the Smoke Blending Mode. This parameter doesnt mix the noise with the source picture, but defines how fractal noise pattern is mixed with smoke.
Colorization - Parameters for defining smoke color- Color Gradient lets you define a smoke color and can be used as a standard Photoshop gradient control. You can define color key marks in the bottom of this control, and transparency marks on top. Color and Opacity controls are enabled when a keymark is selected. To delete a keymark, just move this mark outside of control.
|  |
|
| |  | |  |
 | |  |
| System Requirements | |
| |
 Windows Windows
- Windows OS 95-2000, XP(32/64Bit), Vista (32/64Bit), Windows 7, Windows 8, 10, 11 or later
- 1.2 GHz processor or higher
- At least 1 GBytes of RAM or more
- Graphics card 32-bit color.
- 1024 x 768 display or bigger
- Adobe Photoshop CS5 - CC2023 or later
|
| |  | |  |
Copyright, 2023, AlphaPlugins, LLC.
Author: Maxim Chernousov.
You can find more information about FireFor plug-in. Please, visit Fire's product page on our site. There you can find freshest version of this product. Also you can find tutorials and samples for our products. |
|
|